Getting down and dirty with SoundToys Decapitator
3 years ago

One of the best saturation plugins that I recently learned about that you can use to beef up your sound is the Soundtoys Decapitator. Producers can use saturation in the sound design phase or the mixing phase. When mixing, I like to put this first in my chain. When I first started, I didn’t use saturation because I didn’t understand it, but you can really make sounds more pleasing to the ears. You can beef sounds up, thin them out, give them an edge, warm them, smooth over, pull out elements, and create signature sounds. Saturation is super important for most producers producing inside the box. To add some life to your digital production, consider using Soundtoys Decapitator for saturation. It’s a super versatile saturation plugin that can do a lot. The interface is pretty straightforward, which makes it easy to use. Let’s dive in.
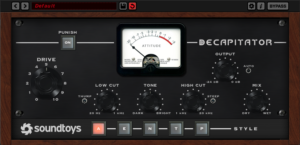
At the bottom of the interface, you can see five styles which you can use in various ways in your production. Depending on the style you use, it will affect how the drive sounds. The first style, A, is modeled after the Apmex 350, a tape recorder used a lot in studios in the 1950s. This style can be great if you want a smooth saturated sound. Next is E, which stands for the Chandler/EMI, and is based on a vintage mixing console from the EMI/Abbey Road Studio. This style adds a decent amount of beef to your sound. It is pretty popular among producers and adds a ton of brightness and fullness to your sounds. The following style is N, modeled after the Neve 1057 input channel. Use this style on guitars and strings that need a little more drive and fuzz. Style T, modeled after the Thermionic Culture, is a distortion device. This style is great for adding warmth and various levels of dirt to just about anything (drums, vocals, keys, etc.). Try using this on drums or anything for a lo-fi vibe. The final style is P which is modeled after the Pentode Tube. This style is similar to the T style but more reserved. One thing to remember when saturating is that if you have a lot of low-end sounds, you will have more distortion when you are driving the sound. Although this can sound great on pure low-end sounds, be careful of sounds that have both low and high end.
Next, let’s talk about some of the other controls. The drive controls how much saturation you are applying to the sound. This gain control increases the level coming out of the plugin. Decapitator has a feature that allows you to manually control the output or automatically with the Auto-Gain function. Next to that is EQ. You have a low cut to remove low frequencies before they hit saturation and a high amount to remove high frequencies AFTER saturation. The Thump control on the low amount will add a few dB of low-frequency boost right at the low cut frequency. The Tone control is like a shelving filter that will adjust the overall color of the sound from “Dark” to “Bright .” The Dark setting will boost low-end frequencies and attenuate high frequencies. The opposite is true for the Bright side. The Steep switch alters the slope of the High Cut filter. In the OFF position, the High Cut filter is a very gentle 6 dB per octave roll-off. It’s a super-steep 30 DB per octave filter. With the mix knob, you can drive the saturation and then pull back on the dry/wet control to get that parallel effect. Finally, the Punish button adds an extra 20db of gain of the sound sent through the Decapitator. At any time, if you need to know what the number readouts are for your knobs, just right-click.
In summary, saturation is a tool to add distortion and color to your sounds. Saturation can also add beef and warmth to your mix. Try placing the plugin in different places in your mixing chain. I like to put mine close to the source of the sound and then EQ after, but there’s no correct answer. It’s essential to use your ears and do what sounds good.
Summary
- Use a saturation plugin to beef up your sounds
- Soundtoys Decapitator is a great plugin to use for saturation
- Style A is excellent for smooth saturation
- Style E is awesome for adding brightness and fullness to sounds (<- I use this the most)
- Style N is excellent to add drive and fuzz to guitars and strings.
- Style T is great for adding warmth and dirt to pretty much anything
- Style P is similar to T but more reserved
- Right-click, any of the controls, to see the actual setting
-Robot Mayhem
Check me out on Spotify